How to Fix Pixelated Images: Causes, Fixes and Prevention Tips
Pixelated images have visible blocks and jagged edges. Learn why it happens, how to fix pixelated photos and logos with AI upscaling, and how to avoid it.
5 min read
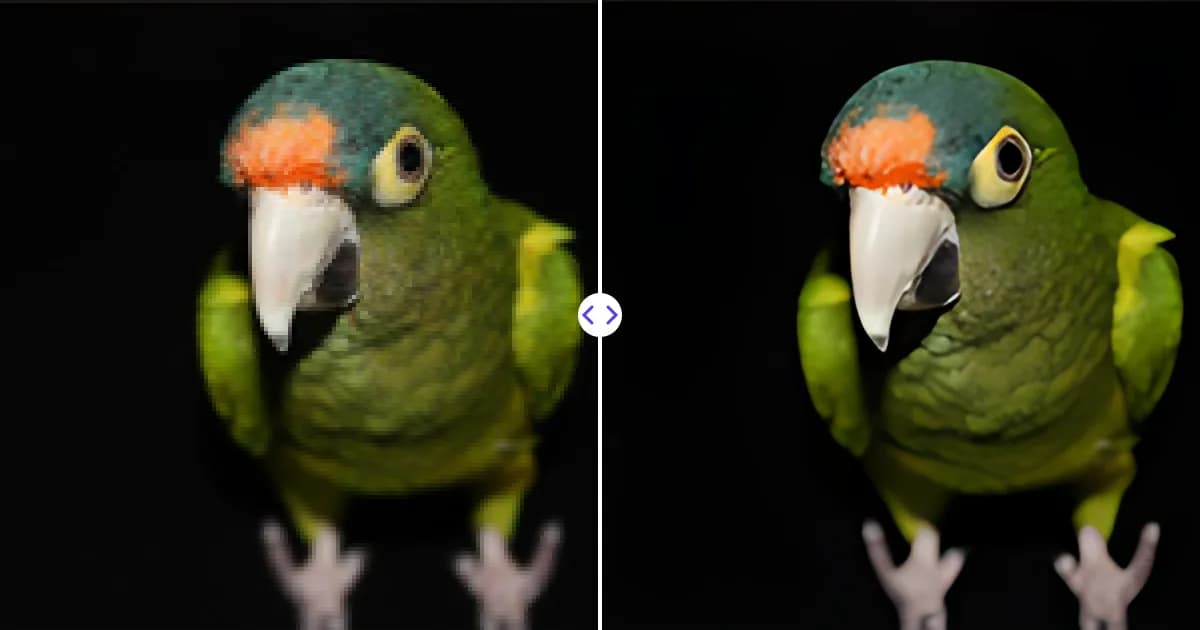
To fix a pixelated image, you need to replace its blocky, oversized pixels with smooth edges and real-looking detail. The most effective way is AI upscaling, which enlarges the image and reconstructs edges instead of stretching the blocks. Below you will learn why pixelation happens, how to fix it step by step, and how to avoid it next time.
What pixelation is and why it happens
Every digital image is made of tiny square pixels. When the pixels are small relative to how large the image is shown, your eye blends them into smooth shapes. Pixelation appears when individual pixels become large enough to see, producing jagged, stair-stepped edges and visible squares.
The usual causes are:
- Stretching a small image. Displaying or printing a 400-pixel-wide image across a full screen or page makes each pixel very large.
- Cropping too tightly. Zooming into a small section of a photo leaves you with very few pixels to work with.
- Heavy compression. JPEG compression works in 8 × 8 pixel blocks. At low quality settings those blocks become visible as a mosaic pattern, especially in skies and smooth gradients.
- Repeated re-saving and sharing. Messaging apps and social platforms often resize and recompress images. Each round can add more damage.
- Screenshots of screenshots. Capturing an image from a screen, then capturing it again, compounds resolution loss.
Pixelated, blurry or noisy?
These problems look different and need slightly different expectations. Pixelation shows sharp-edged squares. Blur shows soft, smeared edges with no visible squares. Noise shows random grainy speckles. AI upscaling handles pixelation and compression blocks well, mild blur reasonably well, and noise depending on its strength.
Fix pixelated images with AI upscaling
An AI upscaler is trained on many examples of low-quality and high-quality versions of the same images. It learns to recognize what a blocky edge was supposed to look like and generates a smoother, more detailed version at a larger size. To understand the technology in more depth, see what AI image upscaling is.
Here is how to do it with the Remove Photo Bg image upscaler:
- Find the best available copy. Search your email, cloud storage or original device for the largest, least compressed version of the image.
- Upload it. JPG, JPEG, PNG and WEBP files up to 16 MB are supported, from any modern browser on desktop or mobile.
- Let the AI upscale it 4×. The model enlarges the image, for example from 800 to 3200 pixels wide, and smooths blocky edges while restoring sharper detail. Output goes up to 4096 pixels on the longest side.
- Inspect and download. Zoom to 100% and check edges, text and faces. If the result works for your purpose, download it.
After upscaling, you can use the larger image as is, or resize it down to exactly the size you need. Scaling a large, clean image down produces a much better result than scaling a small, blocky one up.
Other ways to reduce pixelation
Traditional resampling
In Photoshop, GIMP and similar editors you can enlarge an image with bicubic or similar smoothing resampling. This softens the hard edges of the squares, so the image looks less blocky, but it also looks blurry. It is a quick option when the pixelation is mild and the image will be viewed small.
Avoid nearest neighbor resampling for photos. It copies pixels without blending them, so it keeps every block perfectly sharp and simply makes the squares bigger. It is only useful for pixel art, where that blocky look is intentional.
Light blur and noise reduction
A gentle blur or a JPEG artifact reduction filter can hide compression blocks in smooth areas like sky or skin. It does not add detail, so use it sparingly and mainly on backgrounds.
Recreate graphics as vectors
For logos, icons and simple illustrations, the most durable fix is a vector version. Vector graphics are made of mathematical shapes rather than pixels, so they stay sharp at any size. Many editors include an auto-trace function, and a designer can redraw a logo precisely. If you need a quick improvement in the meantime, upscaling a small logo often gives surprisingly clean results because logos usually have flat colors and simple shapes.
What to expect from the result
Being realistic helps you decide whether a fixed image is good enough:
- Mild to moderate pixelation usually improves dramatically.
- Small, heavily compressed text may become cleaner but can also be reconstructed incorrectly. Always proofread upscaled text.
- Tiny faces of just a few pixels across cannot be restored faithfully; the model can only guess.
- An image that is both pixelated and severely blurred will improve, but will not look like a sharp original.
If the image also contains something you want gone, such as a watermark you own the rights to remove, a timestamp or a stray object, use the object remover to clean it up as part of the same edit.
How to prevent pixelated images
- Keep originals. Store the full-size file from your camera or phone, and edit copies rather than the original.
- Avoid sharing as your archive. Images sent through chat apps or downloaded from social media are often resized and recompressed. Do not treat those copies as your master files.
- Export at the right size. Know the pixel dimensions you need before exporting. Our explainer on DPI vs PPI vs resolution shows how to calculate sizes for print.
- Use sensible compression. For JPG or WEBP, a high quality setting keeps artifacts invisible while still reducing file size. See how to compress images without losing quality.
- Use PNG for graphics. Screenshots, logos and text-heavy images stay crisper in PNG, which does not add lossy compression blocks.
- Crop with room to spare. Shoot a little wider than needed only if your camera has enough resolution; otherwise move closer to the subject instead of cropping heavily later.
Fix your image now
If you have a pixelated photo, product shot or logo, the fastest test is to run it through the Remove Photo Bg image upscaler. It is free, runs in your browser, and processes images on our own servers rather than sending them to a third-party AI service. Compare the before and after at full size and keep whichever version serves you best.