How to Increase Image Resolution: A Practical Step-by-Step Guide
Learn how to increase image resolution the right way: when resizing works, when AI upscaling is better, and how to get sharp results for web and print.
5 min read
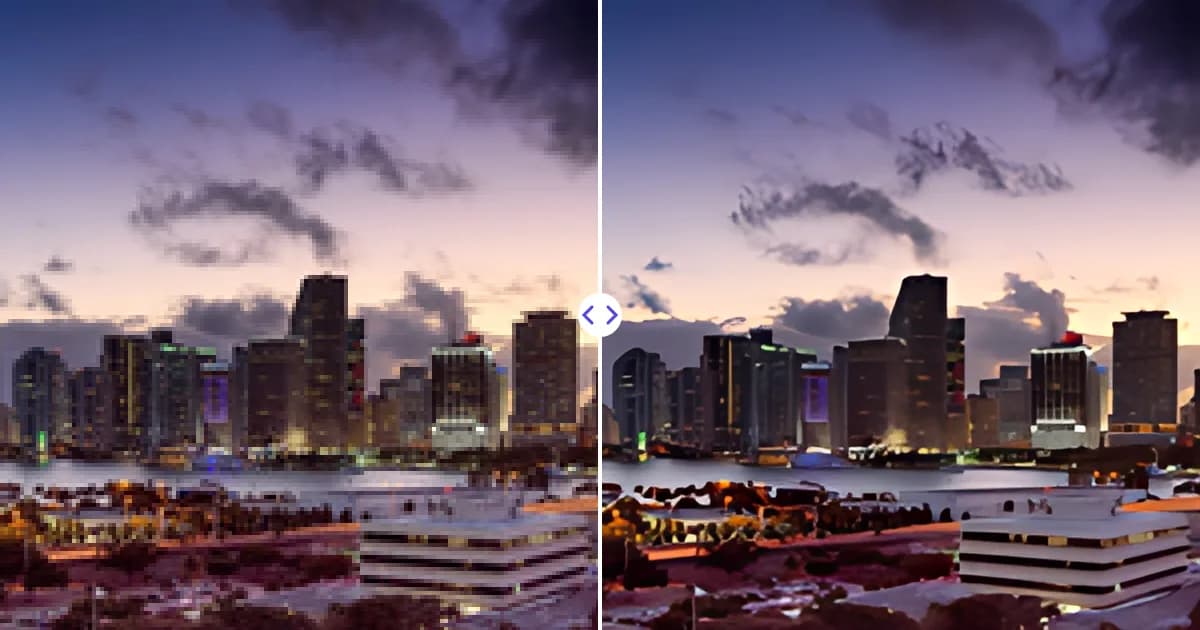
To increase image resolution, you need to add more pixels to the picture. Simple resizing stretches the existing pixels and usually looks soft or blocky, while AI upscaling predicts new detail so the larger image stays sharp. This guide explains both methods, when to use each, and how to get the cleanest result.
What image resolution actually means
Resolution is the number of pixels an image contains, usually written as width × height. A photo that is 1200 × 800 pixels has 960,000 pixels in total. More pixels let you display or print the image larger before individual pixels become visible.
It is easy to confuse resolution with other settings:
- Pixel dimensions are the real measure of how much detail a file can hold.
- PPI (pixels per inch) is a print instruction that tells software how densely to pack those pixels on paper. Changing it alone does not add detail.
- File size depends on dimensions, format and compression, so a large file is not automatically a high-resolution one.
If these terms are new to you, our explainer on DPI vs PPI vs resolution covers the differences in more detail.
Why resizing alone often disappoints
Every image editor can make a picture bigger. When you enlarge an image in Photoshop, GIMP or a basic photo app, the software uses an interpolation method such as bicubic or bilinear resampling. It calculates new pixels by averaging the colors of their neighbors.
Interpolation is fast and predictable, but it cannot invent detail that was never captured. Edges become soft, fine textures turn smooth, and small text gets fuzzy. For modest enlargements, around 110-150%, that is often acceptable. For doubling or quadrupling the size, the result usually looks noticeably blurry.
Some apps add a sharpening filter after resizing to compensate. Sharpening increases contrast along edges, which can make an image look crisper at a glance, but it also exaggerates noise and can create bright halos around outlines. It improves the impression of detail rather than the detail itself.
How AI upscaling increases resolution
AI upscalers use neural networks trained on many pairs of low- and high-resolution images. The model learns what sharp edges, hair, fabric, foliage and text typically look like, then uses that knowledge to reconstruct plausible detail as it enlarges the picture.
The result is not a recovery of hidden information. The model makes an educated prediction, which is why AI upscaling works best on images that are small but reasonably clean. For a deeper look at the technology, read what AI image upscaling is and how it works.
Step by step: increase image resolution with Remove Photo Bg
The Remove Photo Bg image upscaler enlarges images 4× in one pass. A 1000-pixel-wide image becomes 4000 pixels wide, with output up to 4096 pixels on the longest side.
- Choose the best source you have. Use the original file rather than a screenshot or a copy downloaded from a messaging app, which may already be compressed.
- Upload the image. JPG, JPEG, PNG and WEBP files up to 16 MB are supported, in any modern browser on desktop or mobile.
- Let the AI process it. The upscaler enlarges the image and sharpens edges and textures automatically.
- Compare and download. Check faces, text and edges at 100% zoom, then download the larger version.
Because the output is capped at 4096 pixels on the longest side, a source image of roughly 1024 pixels or smaller gets the full 4× benefit. Larger sources are still enlarged, just not by the full factor.
Choosing the right method for your goal
| Goal | Best approach |
|---|---|
| Slightly larger image for a website | Standard resize with bicubic resampling is usually enough |
| Doubling or quadrupling size | AI upscaling |
| Printing a small photo at a larger size | AI upscaling, then set the print PPI |
| Cleaning up a blurry, low-quality logo | AI upscaling, or recreating the logo as a vector |
| Meeting a minimum pixel size on a marketplace | AI upscaling, then export at the required size |
Tips for the best results
Start with the cleanest file
Heavy JPEG compression creates blocky artifacts that an upscaler may interpret as real texture. If you have several versions of an image, always upscale the one with the largest pixel dimensions and the least compression.
Fix other problems in the right order
If you also need to remove a background or an unwanted object, think about the order. Removing distracting elements with the object remover first means the upscaler does not spend effort sharpening things you will delete anyway. For cutouts, upscaling first can give the background remover a sharper edge to work with.
Save in a suitable format
After upscaling, save photos as high-quality JPG or WEBP for the web, and PNG when you need transparency or crisp graphics. Re-saving a JPG many times adds compression each time, so keep a master copy.
Set PPI only when printing
For print, a common guideline is 300 PPI for prints viewed up close. A 4000 × 3000 pixel image at 300 PPI prints at about 13.3 × 10 inches. Large posters viewed from a distance can look fine at lower densities, often 150 PPI or less. Our guide on preparing images for print walks through the calculations.
What upscaling cannot do
It is worth setting realistic expectations:
- It cannot read text that is completely illegible in the original. It may sharpen letters, but it can also guess wrong.
- It cannot fully recover a photo that is badly out of focus or heavily motion-blurred.
- It may smooth very fine textures such as skin pores or film grain, which some people prefer to keep.
- For logos and icons, a vector version (SVG, AI or EPS) will always scale better than any upscaled bitmap.
Within those limits, AI upscaling is the most practical way to increase image resolution when you only have a small file. If your image shows blocky squares rather than general blur, see how to fix pixelated images for targeted advice.
Try it on your own image
The quickest way to see whether upscaling helps is to test it on the photo you actually need. Upload it to the free Remove Photo Bg image upscaler, compare the result at full size, and download the 4× version if it looks right.